oil pressure is at 18psi at idle meaning there is a clog somewhere. the valves are now ticking due to lack of oil flow to them.
it was suggested that i replace the whole motor. instead i think i am going to replace the whole car.
Thursday, December 31, 2009
Thursday, December 24, 2009

Monday, December 14, 2009
Welcome back GTI

Well after some time in the sun saturday afternoon, I was able to get the old girl up and running like a champ.
The oil pressure had been comimg on and I was stumped on what it could be. That was until I decided to go against my gut and replace the oil pick up tube. After some time under the car removing the 20 or so bolts, I got the pan off and got a look at the pick up tube. Yep it sure was clogged up with sludge. So after replacing it, I cleaned out a good amount of the sludge to prevent any future issues. I button everything up and topped her off with fresh oil. Started her and took her for a good hour test drive and no warning light.
GTI 1, Oil sludge 0
While I was out there and had the car under the knife. I decided to rotate my trottle body 90 degrees. There is a growing theory that if you rotate it 90 degrees that it allows equal air flow to all four chambers. So I did it. Did I see or feel a difference? No, I might have been overjoyed with the fact the old girl was running like a champ to notice. I guess time will tell.
Wednesday, December 9, 2009
Update to the update to do list
Things that I got done from that lovely to do list.
Swap out dogbone mount to stock OEM mount
Strip and texture paint mirrors
Things that I have not got done.
Timing belt and all that comes along with doing that
Replace subframe and control arms do to squeaking
Tackle the power steering leak from the hoses coming off the pump
Tackle coolant leak from housing to block
Tackle fuel pump level to get a accurate fuel level reading
New rotors (slotted)
New brake pads
New tires (either match the fronts or four new ones)
New stock OEM axles both sides (never can be too sure)
Add rear swaybar
Add front lower strut bar
Add (maybe) new shock/spring combo (no more than 1.5 inch drop)
New lug nuts with locking lug nuts
Strip and paint rims
Redo door card fabric
Strip and paint valve cover
Tint ?! (Still on the fence on doing this and spending the money)
Monday, December 7, 2009
Doh!

So last week the lovely oil pressure light came on. For what reason I have no idea. My fingers are crossed and I am hoping it is oil sludge build up in the oil pick up tube.
So I picked up a new pick up tube and o-ring. I hope to replace it and check out sludge build up if any.
I hope to have good news this coming weekend pending the weather conditions.
Thursday, November 5, 2009
Monday, October 12, 2009
Monday, September 21, 2009
Mirrors done.
This weekend I took the time and painted my mirrors. The original paint had start to clip on the driver's side and completely chip off on the passenger side. So despite the heat, I followed the below DIY for removing the mirrors.
http://forums.vwvortex.com/zerothread?&id=4099628
The pulling of the clip to release the mirror went smooth on the passenger, but it took me some time on the driver side to release it.
Once they were off, I went ahead and cleaned them off. I removed as much dirt, grease, bugs, or anything that had caked the mirrors. The next step was sanding them. That went quicker that I had thought.
The paint I used was for truck bed liners. It is a rubber like paint that helps stop scratches and bugs from embedding themselves into the paint.
I did about 3 coats of the paint on the mirrors. The paint is a fast drying paint. So I only had to wait 5 minutes in between coats.
I reinstalled, took a break to eat, and then I preceded to pat myself on the back.
(picture coming of finished project)
Friday, September 11, 2009
Long time no update. Updated TO DO list.
I have been busy being busy. So here is a new revised To Do list for the GTI.
- Timing belt and all that comes along with doing that
- Replace subframe and control arms do to squeaking
- Swap out dogbone mount to stock OEM mount
- Tackle the power steering leak from the hoses coming off the pump
- Tackle coolant leak from housing to block
- Tackle fuel pump level to get a accurate fuel level reading
I am hoping to run the GTI at the Tail Of The Dragon by spring of next year. So below is my TOD To Do list.
- New rotors (slotted)
- New brake pads
- New tires (either match the fronts or four new ones)
- New stock OEM axles both sides (never can be too sure)
- Add rear swaybar
- Add front lower strut bar
- Add (maybe) new shock/spring combo (no more than 1.5 inch drop)
- New lug nuts with locking lug nuts
The last To Do list is to make the car pretty.
- Strip and paint rims
- Redo door card fabric
- Strip and texture paint mirrors
- Strip and paint valve cover
- Tint ?! (Still on the fence on doing this and spending the money)
That is all i got for now. Its definitely going to be interesting. Now I only have to find the time to do it all.
Friday, July 10, 2009
EIP Dogbone Mount review
So once the motor mount broken in January, I was quick to search Vwvortex (http://forums.vwvortex.com/zeroforum?id=4 ) for a new yet used motor mount. I came across a EIP mount. At first I researched all the trash talk about how it is a OEM mount with aftermarket bushings, which I am still unsure on the truth on that one. I knew from the Black Forest Inds mount inserts that aftermarket bushings are not the greatest idea for automatics due to the increased shaking.
So I went ahead and got for 2 reasons: 1. it was a deal to pick up and was the going cost of a used OEM one. 2. I wanted to experience a different stiffness bushing on my car.
Well, as I should have known, the shaking was the same as the Black Forest Inds bushings. So with a new OEM mount coming my way soon. I can only say and review this:
The overall quality of the part is excellent. The mount, well, looks OEM, so the welds and material used are good.
The performance of the part was good for the fact that stiffer bushings are able give the car less slack when getting down on the gas. So when you hit it, it moves.
The shaking is not horrible, but not fitting for daily driving not mention with the A/C on which increases the vibrations. If only my car was a race car I would not have these worries.
Picture for reference:

Thursday, July 2, 2009
Wasted my time?!
So the car is running and not only running, but running great. no issues besides the vibration from the motor due to the EIP dog bone mount. So I might swap that out yet again for a OEM one. Automatics are not meant to have those stiff bushings. Note to self.
No more oil light. So after securing the wiring harness to the sensor more than how it was sitting, the light has not come on. So it was in fact a wiring issue.
So was the new oil line, new sensor, and all that work a waste since it was the wiring harness. I say no. there was a small oil leak at the oil feed line to the turbo. So with the new line and all, that work that is taken care of. The new sensor was only $20 and took 5 minutes to plug in. So not bad I say.
So the car is running great. It only needs a bath, some wax, and then interior cleaned out. Then it will be good to go.
Saturday, June 20, 2009
It is alive....for now.
After being sick for 2 days with what I can only call my stomach hating me sickness. I finally got out to the car. I started it up and then after staring at engine while it was running. I noticed a nipple under the intake manifold that was exposed. After plugging it with my finger and unplugging I noticed the engine surging and evening out. Once I noticed that. I grabbed a vacuum line plug and well plugged it.
Now she runs with no rough idle. I did some driving today. About 15 to 20 mins each time and did that about 3 times. Still no oil pressure light.
So at this moment, my stomach still feels rough, but the car is drivable and seems to be working better than I expected.
So good news all around. Now I need to test it again and run out for some more pepto.
Monday, June 15, 2009
Things that are cheering me up right now.
I needed a little pick me up. So here are somethings that are cheering me up right now cause my car is not.
Ken Block videos:
The full video
http://www.youtube.com/watch?v=HQ7R_buZPSo&feature=player_embedded
The build
http://www.youtube.com/watch?v=kTB6tpnmveo&feature=related
His car:

This little guy:

And this guy always cheers me up.....I love Panda Dog:

Ken Block videos:
The full video
http://www.youtube.com/watch?v=HQ7R_buZPSo&feature=player_embedded
The build
http://www.youtube.com/watch?v=kTB6tpnmveo&feature=related
His car:

This little guy:

And this guy always cheers me up.....I love Panda Dog:

No news and no updates
I have been lazy and busy at the same time.
The car still has a rough idle.
Rough idle causes:
misfiring
vacuum leak
MAF sensor fail
So, since the car had a misfire issue not that long ago, I plan to tackle the first two first. This week I will be picking up new spark plugs and trying those out. I am also going to remove the catch can that I spent a lot of time on. The reasoning behind that is to see if the reducers I placed in there are not big enough to allow the proper air flow thus cause a vacuum leak like feeling.
If I am still in the same boat after those two things, then its time to clean the MAF sensor.
If that doesnt work..(there's a plan for the plan). Then I am going to break down and take to a shop. There is a good one right down the street from me.
Needless to say I have not fully driven the car in some time. I still go out and start her up to keep the battery alive, but that is about it. It has been 6 months since I have fully taken it out. Driving the 3 miles to work does not count.
I miss driving and I miss having a fully working car.
Tuesday, May 26, 2009
Rain rain go away
With the recent downpours here in the not so sunny state, I have yet to do anything to the car. It sits in the same condition as when I last posted.
I am more and more under the belief that the oil pressure issue is a wiring issue to the sensor at the oil housing. I recently secured the wiring to the sensor more into the plug. After doing so the car ran perfect for around45 minutes without a single light. The next day it ran for 30 minutes and no issue. The following day for 15 mins to work and came on. So it has to be that wiring and that has come loose. Too bad the wiring for the engine is all one harness. So replacing the wiring would be a bigger job that what I am willing to take on at this moment.
With that, I am tempted to get a electrical oil pressure gauge set up that allows me to run both the stock and an aftermarket one. Thus being able to see the stock sensor light come on and the aftermarket gauge to tell me that everything is good to go.
On a rather large side note. The old girl is up for sale on the VwVortex. I am halfway throwing in the towel now in search of a new beast to tackle. If it doesn't gain any interest for sale, then I am sure I will be heading back to the engine to get her fully runing and working like the champ she is.
If you are one of the few that might read this and am interested in the GTI. Here is the original post.
http://forums.vwvortex.com/zerothread?id=3997167
More up to date pictures are coming once we get a weekend of sunshine.
Later gators.
Tuesday, May 12, 2009
It's alive......kinda
So I took her for about a 30 minute drive on wednesday night, then another 45 minute drive yesterday and no issues. There is a slight bounce in the rpms at idle which could be caused by either a leak in the vacuum system or a bad Mass Air Flow sensor.
BUT this morning I decide to take the old girl to work with me. A 10 minute drive. As I am pulling into the parking garage bang the oil pressure light comes on.
What can it be?! I am leaning towards a wiring issue more than a oil pressure issue. Since it did not come on during the longer drives. I think I am about to break down and take it to a shop to have it looked at.
But first I might pick up a oil pressure gauge to really see if that is in fact the issue.
Monday, April 27, 2009
Happiness to sadness
Updated parts list from home depot
1/2 heater hose 6 feet long (only length they had)
3/4 heater hose 10 feet long
3/4 plastic t-fitting
3/4 to 1/2 reducer
Vacuum caps in varies sizes
All parts installed and good to go. Pictures to come.
I got a chance to install new plugs and reseal the new valve cover gasket.
Started her up last night. Rough idle to start then smoothed out. I let it run for about 10 minutes before taking it for a drive. Got it out and then 15 minutes down the road the Oil Pressure Light came on yet again. It was a happy moment that got turned to poop.
So I am back to the drawing board with the oil pressure issue.
Friday, April 24, 2009
Key ring fix!
So while I am waiting for parts to be shipped, I decided to finally after 2 years to fix my VW key.
I found a link off VWVortex forums to fix this.
Here it is:
http://stinogle.com/2009/02/12/fixing-a-vw-key-ring/
It is a nice step by step to drill a new hole into the key to attach a key ring.
And here are my bad cell phone pictures. Enjoy!


I found a link off VWVortex forums to fix this.
Here it is:
http://stinogle.com/2009/02/12/fixing-a-vw-key-ring/
It is a nice step by step to drill a new hole into the key to attach a key ring.
And here are my bad cell phone pictures. Enjoy!


Wednesday, April 22, 2009
New list of parts
Catch can setup steps to change out the PCV valve system.
I got the catch can off Ebay about 2 months ago. I got a cheap $20 one. It will do the trick.
Then this week I ordered these:
A block breather adapter for the PCV. 034 Motorsports has the direct fit for my car.
http://www.034motorsport.com/product_info.php?cPath=28_61&products_id=392

The to run off that I picked up this gem. I wanted a 90 degree so that I dont have to try to bend the heater hose:
http://store.summitracing.com/partdetail.asp?autofilter=1&part=EAR-984212ERL&N=700+4294733687+115&autoview=sku

Definitely not happy with the price, but it was the only one they had that was able to ship now. Everything else I would have to wait a month for.
So now I have a list for home depot to pick up some heater hoses and etc. Here it is:
1/2 heater hose 2 feet long
7/8 heater hose 3 feet long
3/4 heater hose 6 feet long
3/4 plastic t-fitting
3/4 to 7/8 reducer
3/4 to 1/2 reducer
7/8 to 1/2 reducer
Vacuum caps in varies sizes
To clamp everything I took my co workers advice and am going to pick up some high temp zip ties. It will 1. be cheaper and 2. have a cleaner look.
Pictures to come once everything is gathered and ready for install.
Monday, April 20, 2009
Not quite there yet
Spend a day off from work Friday and got everything back together in a timely manner. New line in and all turbo parts reassembled. Bad cell phone pic of the engine bay with the new feed line line is highlighted by the yellow arrow.

When to start the car and was giving a rough idle. Then it stalled out. It did that twice before throwing a blinking check engine light. But it did start and rev'ed nicely.
So, I had a friend come over and scan it and was throwing misfires on cylinder 1 &2. Swapped coil packs with cylinder 4. Then was still throwing misfire in 1. I took out the spark plug to find it and the rest of them covered in oil. I check the newly installed valve cover gasket and it was not leaking down into the cylinders.
So now I am either looking at a faulty PCV system or failed piston rings. I am hoping for the PCV system fail. Fingers crossed yet again.
If it is the PCV the solution will be a new valve and a catch can set up to catch the excess oil.
Thursday, April 16, 2009
Ready to get dirty yet again.
So this weekend has become d-weekend. I will be putting the car back together with the newly installed oil feed line to the turbo. So to be honest, I am excited.
If the oil pressure light comes on still after everything, then a friend suggested a engine flush chemical to flush out all the oil sludge. That could be causing the main issue. Now I am nor will not be disappointed if the new oil line does not fix the issue since it was leaking and its better to have changed it.
So I will keep this posted on the outcome. Pictures to come.
Monday, April 6, 2009
Needed some more inspiration
So while I am counting down the days until I can get back to work again on the GTI. I needed something to bring me back to why I am still doing all this besides the most obvious of needing the car working. I took a scroll over the old Vwvortex and was looking around at some MK5. I saw a stock one this morning on my way to work and noticed how nice they look from different angles. I went right to the classifieds on the vortex. If you want to see a good collection of pictures of cars, go the classifieds. Most people who really want to sell their car will put as many pictures as possible of it up.
So then I came upon this beauty.

The full classified can be found here:
http://forums.vwvortex.com/zerothread?id=4179388
Along with some other amazing shots of it.
The full details of the car are listed there as well. The height is nice for the shots, but I would want to raise it up some for daily driving. The BBS CHs look incredible on the Candy White paint. Scroll down to the rolling shots in the link. One of those is now my background at work.
Oh well. I would end with saying maybe one day, but after the recent ordeal, blood, sweat, tears, and money that have gone into my MK4. I will not be getting into another VW again. Unless one falls into my driveway, then who am I to complain.
Sunday, April 5, 2009
GTI: 0 Me:1 big 1
So I bring good news. The bolt has been defeated. The JB Weld did not hold as I had hoped and thought it would. Once that had failed, I took a scroll up to my local Sears and picked up a vice grip $9 and a set of bolt outs $3o. The vice grip did nothing but strip the outside of the bolt some more. The bolt outs however did some magic and got the bolt to turn and then come out.
I recommend these:
http://www.sears.com/shc/s/p_10153_12605_00952166000P?mv=rr

And lastly, the bolt.


So now I have the task of putting the car back together. That is, once i get the turbo out and replace the oil feed line.
I recommend these:
http://www.sears.com/shc/s/p_10153_12605_00952166000P?mv=rr

And lastly, the bolt.


So now I have the task of putting the car back together. That is, once i get the turbo out and replace the oil feed line.
Friday, April 3, 2009
Possible problem solved
Well thanks to a friend's idea. I used JB Weld to secure a older allen key wrench into the bolt. It is setting now. I placed it in there last night around 6pm. So by tonight it should be good to go as in come out of its hole. But with the pending doom of weather that looks to be coming my way. I may not get to it until next week. I hope to at least try to turn the wrench and remove the bolt tonight or tomorrow morning.
In other news, I was able to get the corrected fitting to the oil tap on the oil housing. Its a 12m to -4AN fitting. Normally runs about $12.99 plus shipping from Integrated Engineering. Great guys there and helped me out with finding the correct bolt. I had purchesed a 10m to -4AN and that was too small. Then I was pointed in this direction below.
http://www.intengineering.com/M12-to-4-AN-Oil-Feed-p4452259-1-2.html
Goes to show, don't believe everything you read on Vwvortex.
That is all for now. Peace!
Monday, March 23, 2009
Time wasted
So needless to say I am still stuck at where I was with the last post. I have tried many of methods to remove the bolt. All failed.
Now I am left with 2 options at this point.
1. remove the intake manifold to be able to drill down into the bolt once the manifold is removed.
Downside to that is dealing with gas since the injectors are located on the manifold.
2. try a bolt out removal set from sears.
http://www.sears.com/shc/s/p_10153_12605_00952061000P?vName=Tools&cName=Mechanics+Tools&sName=Taps+%26+Dies
So I am at a stand off now with that one little bolt.


That is all for now.
Monday, March 9, 2009
Trouble finds me yet again

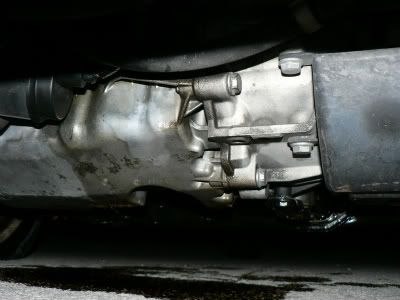
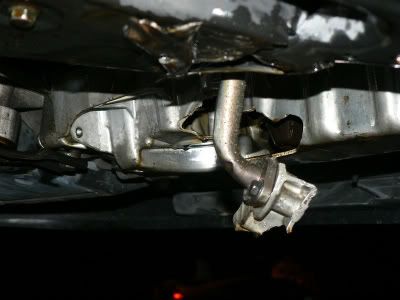
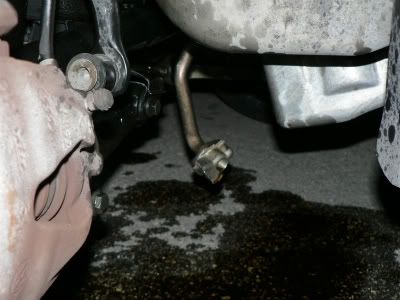
Starting the removal of the turbo and hit a road block. There is a bolt that holds a bracket that holds the stock oil feed line in place. I definitely stripped that bolt. :( See picture below of bolt in question.
So now I am looking to remedy this situation soon since the rest of the turbo is ready to come out.
On a positive note, I did spot the leak of oil. It is coming from the oil feed line at the turbo. So pending the removal, I should be good to go to getting her fixed soon.
Wednesday, March 4, 2009
Where am I?!
No more work done yet. Got a case of the "I'm sick and tried" over the weekend. This coming weekend is D-Day. I have gotten a new DV hose and new hose from the change over pipe to the N75 valve.
I did take a good look at the turbo over the weekend. It is still in the car at the moment. I did notice that there is some leaking of oil at what I can tell is the feed line input to the turbo. So that could be good news if it is the line itself. I hope to get a better look at it this weekend before taking it out. If I can avoid removing the turbo, I will be happy.
Ordered a basic universal catch can off ebay to help with the oil vapor issue with the PCV system. That is a project that i plan to build over time and is not set to go into the car this weekend. There is a lot involved with setting up a good catch can system in the GTI.
I need to tap the oil breather port on top of the oil filter housing. I plan to pick up a nice AN fitting for that. Then run a normal rubber hose to a t-fitting for the port off the valve cover to a reducer since I'm sure the catch can ports are not big enough for the hose being used. Then to the catch can and then out to the PCV with a reducer in there too for hose fitment.
So that will be a fun project to build over the next couple of months. My goal is to have that in by summer (May-June).
After the oil leak is found and dealt with. My next projects are (in no order):
catch can set up
sand, prime, and paint rims
timing belt, water pump change (past due)
new rear tires
re fabric the door panels
fix latch to pull driver side rear seat down
sub frame squeak fix
power steering leak fix (I'm thinking braided with AN fittings)
tint to protect new fabric
reinstall holy crap handles (I don't know why I haven't yet)
fix blown LED behind cluster
replace fuel pump gasket
replace fuel filter
That list is overwhelming.
Tuesday, February 24, 2009
The painful start
I started this past Saturday on what I had hoped would be a nice 2 day "fix the beast" weekend. It ended up being a 1 day "fix the beast" weekend. We had other plans for Sunday.
So I started with installing the SAI block off plate (http://www.intengineering.com/VW/18T/Accessories/18t-SAI-Blockoff-Plate-p3333558.html) and the removal of the SAI pump. The plate fitlike a gloves and bolted up nicely. The hard lines came out with ease then came the pump, which was not so easy. It was bolted to the side of the block in the front. They did not make it easy to remove the bolts holding the pump on. After some brain and muscle power i got the pump out. The bay looks 10 times better with all the extra out. It is starting to look like a normal engine bay now. I secured the extra pump wires for now. I will go back later and find a way to tuck them out of the way or delete them totally.
Next, I went for the valve cover gasket change. I tend to always get nervous when working with the engine exposed like that. I removed all the bolts and coil packs. I took my time getting the bolts off, since they are so small I did not want to lose one by dropping it or worst case dropping into the engine. The new gasket from http://www.germanautoparts.com/ fit nicely.
The final part I got to before calling it a day was the oil. I drained the oil and replaced the filter. I decided to leave the engine empty of oil and coolant for now, since I am still looking into removing the turbo to conquer that oil leak.
I decided to call it a day there. Little did I know that the bending up/down and getting up/down would do a number on my legs. They are sore now.
Pictures to come once I get off my butt and take some.
Checklist of what to do:
remove turbo
check oil lines on turbo and oil seals
fix oil leak (fingers crossed)
reinstall turbo and other misc parts that were removed
refill oil
refill coolant
start car with fingers crossed
Wednesday, February 18, 2009
Getting my inspiration on!
While I get everything ready for this weekend's big install of everything. I found two amazing engine bays that would inspire anyone. (at least anyone who likes VWs)
This first one is by a guy that goes by Rogue Status on Vwvortex.com. He has been nice enough to help me out with a few questions in regards to braided lines. His bay is so amazingly clean. I only wish I had the time and money to invest into a great set up cleaned engine like this.

The next is by far the most creative bay I have seen thus far. It is by Tattoo24v (on Vwvortex.com). The orange is also carried through to the rims, interior, and body pinstripes. I love the leaf painted pipes and orange valve cover and intake manifold.

I can not get enough of looking at both of these. I think I will be in serious debt and relationship trouble if I attempted to try to do something similar to my engine bay.
Monday, February 16, 2009
Broken motor mount equals trouble part3
I received the rest of the other parts I ordered. (Pictures coming soon)
1: -4 male to female 90 degree for $ 12.99
1: -4 to 12mm banjo for $ 11.99
I picked them both up from http://www.pegasusautoracing.com/home.asp
It was the cheapest I found them online. Get site for things like that and other actual race gear.
2: -4 to 10mm adapters. I really only needed one, but at $ 9.99 why not get two.
I picked these up from http://www.intengineering.com/
Along with the SAI block off plate for $ 39.99
The adapter and the block off plate came nicely packaged
The fittings and the adapters are going to be used to finish my new oil feed line to the turbo.
The block off plate is to remove the SAI system out of the car to cut down on vacuum leaks and etc.
I was away this past weekend, so no work was done on the car. I am aiming for this coming weekend to get everything installed and the car started up.
I only need a few things now. A oil drain pan and 2 qts of oil. A new DV to change over pipe hose and new N75 to change voer pipe hose. I hope to find those needed ones at the local parts store.
Tuesday, February 10, 2009
Broken motor mount equals trouble part 2
The part collection has begun. Out of the 7 things ordered, today I received 2 of those parts.
The first is a new OEM valve cover gasket. I noticed while researching my oil leak that my gasket is seeping out a good amount of oil. I ordered the gasket from GermanAutoParts.com They have great prices for OEM parts. A valve cover gasket at the dealer is roughly $40-50 and at other sites about $40. They had it for $19.40 plus shipping.
It can be found here:
http://www.germanautoparts.com/Volkswagen/Golf/Engine/102/11
Actual part:
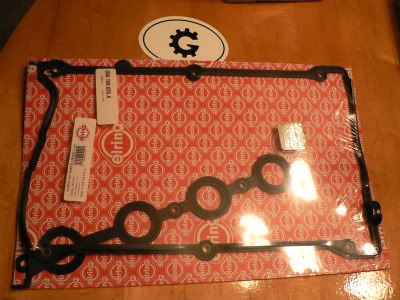
If you do decide to order from them, a word of advice. They do not charge shipping right away. They try to offer the best price for shipping, so you will be charged later for the whole amount within a day or two of ordering. The shipping is quick as they use UPS Ground.
The second part to come to my door is a 36 inch braided line with -4 AN fittings at each end. This will be my new oil feed line. I got the part from a fellow VW owner on Vwvortex. I priced around the line and most sites had it for about $40. The line is a great upgrade for those who are thinking of going big turbo down the road. Am I? Well we will see.
For the oil feed line a braided line with -4 AN fittings is close to stock that you can get without naturally going stock.
This is my new shinny part: Haha
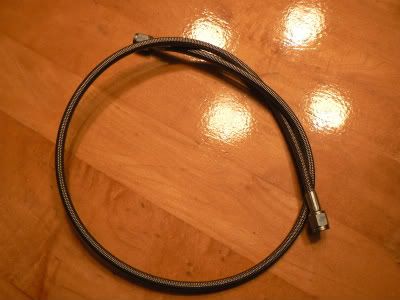
For anyone who is interested in changing out the stock oil lines for braided lines and AN fittings. Here is some help. A -4 is good for the feed and a -10 is good for the return line to the turbo. The fittings for each vary. Check out:
http://www.intengineering.com/Shop/Control/fp/SFV/32093
They have a good selection for AN fittings and the ones that best fit VW/Audi models. Such as the return line adapter for the pan. All lines to a stock turbo will require some research for the right size.
And now I'm off to bed.
Monday, February 9, 2009
Hancook Ventus HRII
I picked up a set of Hancook Ventus HRII H405 205/16/55 from what was Edgeracing.com in December 2007. (which sadly Edgeracing closed down in January 2009)
The tire seemed to have good customer reviews from the different websites I found, great ratings for dry and wet driving, and couldn't beat the $72.00 per tire price plus shipping. Which shipping was never more than $40.00 for 4 tires seeing how they were located in Ft Lauderdale.
I got the tires mounted at my local Firestone for about $12 bucks per tire/rim. Also good deal!
As I left Firestone, the tires felt good. No excess vibration or tire noise. After driving to work one day down I-4, I started to notice some tire noise. I stopped at the nearest gas station to check the air level in the tire. All were fine. Then I began the research on the tires I just got. They are very noisy over the speeds of 45 mph and the tread wears fast according to other review I have found. Too bad I did not find these reviews before buying these.
Lesson learn. Next set of tires research has started.
Check list for next set:
High wet and dry driving rating
High thread rating
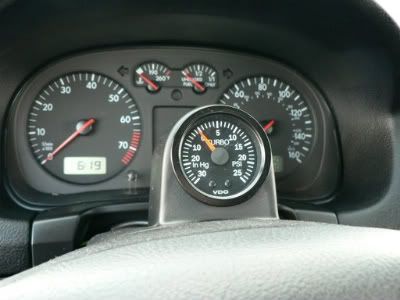
VDO boost gauge w/ New South center pod
So about a year ago i picked up a VDO boost gauge 0 to 25psi and 0 to -30 hg (gauge goes one way then the other).
I got it with a kit deal from Black Forest Industries
http://store.blackforestindustries.com/index.html
The deal was it was the gauge and the center pod for $75.00 plus shipping. Not bad if you were to add it up and buy apart. The kit came with the hardware needed to install and some generic directions.
Kit:
http://store.blackforestindustries.com/newsocepodwb.html
Helpful DIY:
http://forums.vwvortex.com/zerothread?id=583081
The gauge did what it was meant to do and what any other boost gauge does. I enjoyed seeing the needle move every time I took off or what have you. But, after a good conversation with my co-worker I am to the understanding that if you are not recording the data in some manner, have it set up for any type of big turbo or tuned turbo setup, or reprogrammed the ECU for more boost, then the gauge is ultimately only for fashion and not function on stock motors with stock turbos and stock ECU. It did let me know that my car is running at half boost (6 psi compared to stock 12 psi). So it was not a total waste, but at the same time in order for me to watch the gauge and see that I had to keep my eyes on the gauge and not on the road. Which is never a good idea.
About 2 months ago I sold it on Vwvortex to a fellow VW owner.
Broken motor mount equals trouble
January 2009
Broken motor mount is more trouble then it seems.
the lower dogbone motor mount broke on me while i was leaving work last month. the engine moved forward and back before i realized what had happened.
pickup a EIP mount from a fellow vwvortex for half the price of it new. installed and was thinking i was good to go.
here is helpful DIY:
http://www.ottawa-vdubbing.com/forums/phpBB2/viewtopic.php?t=13397
nope, i wasnt. the oil pressure light came on. so i quickly parked and shut off the engine. i was only a block away. there is a nasty little leak around the turbo. after further investigating, the leak is coming from the turbo. so the tear down of the turbo and related parts has begun. i believe i have it narrowed down to the turbo feed line from the block. more than likely got pull lose from the engine moving with no mount motor.
so parts are ordered and a list of such said parts with come with prices. found some good deals, but it required shopping around.
i am replacing the feed line with braided lines and AN fittings.
also removing and blocking off the SAI pump system.
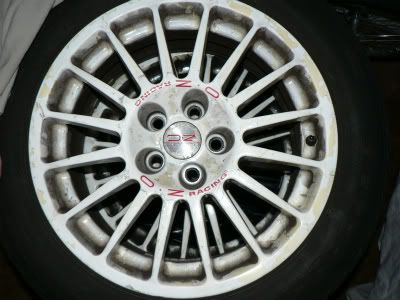
OZ racing rims
Pick up these rims off of tamparacing.com
the stock set i had was no good anymore seeing how one was bent from the forklift accident.
paid a outstanding good price for them. the paint is chipped and peeling on all four. but you cant beat some OZ Racing rims.
plans are to sand and paint them. not sure of the color as of yet.
the stock set i had was no good anymore seeing how one was bent from the forklift accident.
paid a outstanding good price for them. the paint is chipped and peeling on all four. but you cant beat some OZ Racing rims.
plans are to sand and paint them. not sure of the color as of yet.

Forklift saga part 2.....the fix.
January-February 2007
Fix damage with:
new suspension. went with the 20th suspension. 1 inch drop and stiffer shocks
purchased from UndergroundVWParts (vwvortex user name). they are a good used parts dealer from Tampa. fair prices and quick shipping.
new fuel pump. the original one was broken in half. here is a helpful DIY:
http://forums.vwvortex.com/zerothread?id=1276409
and this
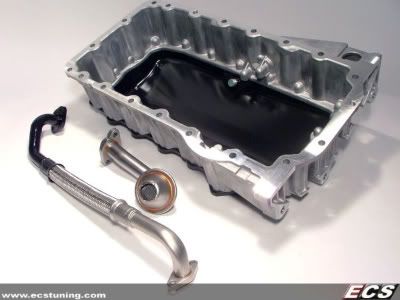
ECS Tuning Hybrid Oil Pan Repair Kit
comes with the GLI half steel and half aluminum pan. the steel at the bottom. also comes with new pickup line inside the pan and return line from the turbo to the pan.
retails for $295.50 (research around for a better price)
open link in new window otherwise it will shrink your browser.
http://www.ecstuning.com/stage/edpd/pagebuild_v2.cgi/?html=learnmore.html&productID=4369
i am very happy with the purchase and quality.
install went smooth and easy with a fellow VW owner and tech. be sure to remove old pan and keep all bolts.
Fix damage with:
new suspension. went with the 20th suspension. 1 inch drop and stiffer shocks
purchased from UndergroundVWParts (vwvortex user name). they are a good used parts dealer from Tampa. fair prices and quick shipping.
new fuel pump. the original one was broken in half. here is a helpful DIY:
http://forums.vwvortex.com/zerothread?id=1276409
and this
ECS Tuning Hybrid Oil Pan Repair Kit
comes with the GLI half steel and half aluminum pan. the steel at the bottom. also comes with new pickup line inside the pan and return line from the turbo to the pan.
retails for $295.50 (research around for a better price)
open link in new window otherwise it will shrink your browser.
http://www.ecstuning.com/stage/edpd/pagebuild_v2.cgi/?html=learnmore.html&productID=4369
i am very happy with the purchase and quality.
install went smooth and easy with a fellow VW owner and tech. be sure to remove old pan and keep all bolts.

Forklift saga part 1.....the accident!
Just to catch everyone up.....
January 2007
GTI: 1
Me: 0
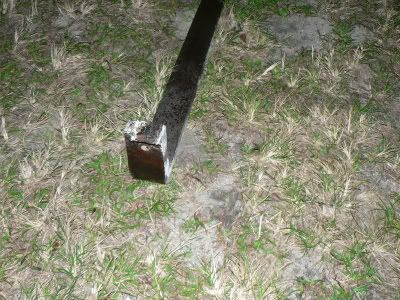
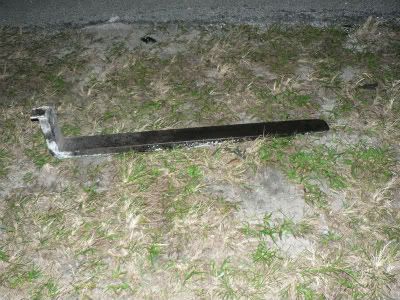
Ran over forklift arm on SR-50. why it was there? who knows. 1 week before we "were" going to drive to altanta.
List of Damage:
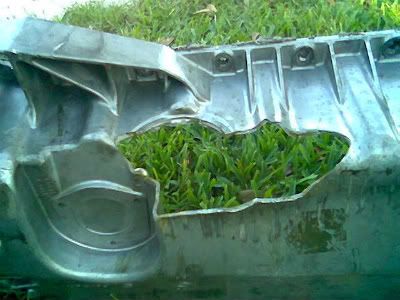
Oil pan: big hole in it
Oil return line: ripped from pan
One rim: bent
Stock suspension: out of whack due to collision.
Oil: 4 qts Castro 5w-40 dumped down a 15 foot part of sr-50.
Ego: bruised
January 2007
GTI: 1
Me: 0
Ran over forklift arm on SR-50. why it was there? who knows. 1 week before we "were" going to drive to altanta.
List of Damage:
Oil pan: big hole in it
Oil return line: ripped from pan
One rim: bent
Stock suspension: out of whack due to collision.
Oil: 4 qts Castro 5w-40 dumped down a 15 foot part of sr-50.
Ego: bruised


Subscribe to:
Posts (Atom)